
No Sales Tax
The Nature Of Target ID CTX 3030 VS Minelab Equinox & Manticore
TID’s (Target Identification Numbers) are numbers that represent the type of metal your detector is detecting.
Target ID is an astonishingly simple tool, with a lot of computing and processing behind it.
First the detector has to send out a signal into the ground, then receive that signal, then process and compute it into a TID number on your detector screen.
Why then do the CTX, Etrac, and some older detectors have two TID numbers (ferrous/conductive) instead of one?
Non-ferrous coins (copper, aluminum, silver, gold) all have different conductivities. Coins conductivities are based on the ‘type’ of metal that they consist of and also by their shape, diameter, and thickness. For example TID numbers on Indian Head Pennies vary, because they can be different thicknesses and percentages of copper.
Analyzing the different conductivities of metals is how your detector discriminates between targets.
Smaller or thinner coins will have a lower conductivity, while larger thicker coins will have a higher conductivity.
The metals inside the coin will also affect conductivity. Nickel and gold being low conductors, and copper and silver being higher conductors.
(Below: CTX 3030 Screenshot with Ferrous/Nonferrous TID Numbers)

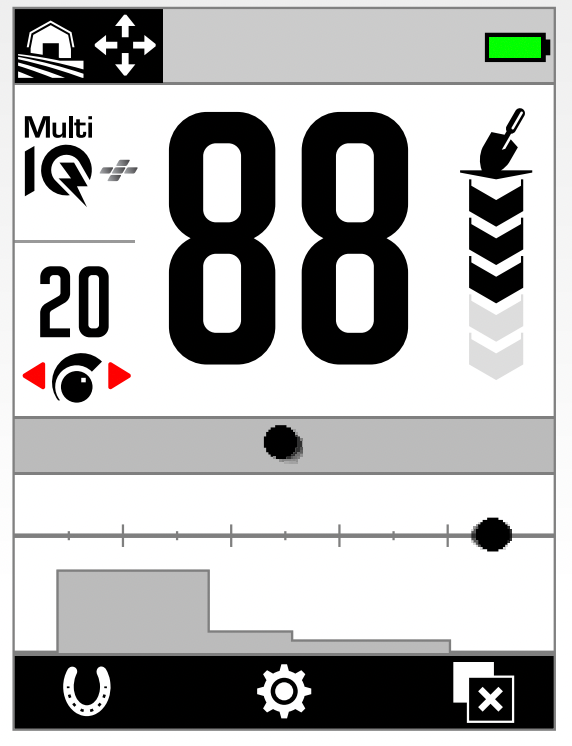
(Below: Minelab Manticore Screenshot with Single TID Number)

The Curse of Compressed TID
Compressed TID results in two or more objects sharing the same TID numbers. This is why it is so invaluable that Minelab has increased the Target ID range on the Equinox 700, 900, and the Manticore.
On the old Minelab Explorer, the TID conductivity range was compressed, resulting in many targets having the same TID.
However on the CTX 3030 and the Etrac, Minelab expanded that Conductive TID range, resulting in more accurate coin TID (specifically high conductors).
Interestingly, it was sometimes easier to identify an object by its Ferrous number on the Explorer than its conductive number due to the ferrous range being larger!
On the Minelab Equinox, the TID scale was only 0-39, resulting in gold and aluminum especially being very compressed. However, on the new Equinox 700, 900, and Manticore, the TID ranges from 0-99 (not including iron). This results in more accurate TID readings, and the ability to avoid more trash.
For instance, on the XP Deus 2, almost all gold jewelry doesn’t even start showing up until a TID of 30! Imagine, you can literally ignore almost all targets under TID of 30! (Please note: It is invaluable you test these principles for yourself).

Why Two TID Numbers?
Why then, did Minelab give ferrous and non-ferrous numbers to coins if coins are generally non-ferrous in nature? The ferrous characteristics of coins are generally the same across the board. So one should expect that number to be relatively similar no matter what coin is under your coil.
However, ground mineralization and nearby ferrous objects will skew the ferrous characteristics of a target, causing the CTX/Etrac/Explorer to give varying ferrous TID readings.
A Top Minelab Representative Stated
“In regards to the MANTICORE's 2D ID Map, the reason for the Upper and Lower Ferrous limits as it allows the user to visually see how ferrous a target may be.
I would not compare this to the CTX 3030 but more so similar to the Equinox's Iron Bias modes FE or F2. The FE & F2 modes can only be utilized one at a time whereas the MANTICORE, you are utilizing both simultaneously.
The Upper Ferrous limit is where "Most Ferrous Targets" will appear.
The Lower Ferrous limit is where some "Large/flat" ferrous targets will appear.”
Iron Bias
The purpose of Iron Bias is to classify targets as more likely to be ferrous depending on whether it presents both ferrous and non-ferrous signals. All ferrous targets can present a combination of ferrous and nonferrous responses.
Large ferrous targets can present an even stronger non-ferrous response. This is very evident when you go over a large can, or old piece of equipment, and it has a long high false signal.
The higher you set your iron bias, the more likely the detector will classify a target with any iron response as iron. Therein lies the danger of using iron bias, you are risking masking good targets that might be near iron, or concealed by heavy iron mineralization. Increasing your iron bias will also make the detector’s processor work harder– and therefore sacrifice power and depth.
How Does Iron Bias Compare to the CTX/Etrac/Explorer Target ID Screen?
In an effort to make discrimination more simple, Minelab deprived you as the user of a very important tool by creating Iron Bias.
With the old Ferrous/non-ferrous target ID, you could use your own judgment as to the ferrous/nonferrous nature of the target by analyzing the dual TID reading you were getting.
Minelab probably assumed most people wouldn’t want to go to the trouble of comparing and analyzing the ferrous/nonferrous TID numbers of the targets they were digging. They assumed they were doing you a favor by giving you the option to block out anything with a ferrous nature with Iron bias.
However, we know from the information above that Iron Bias can mask targets and sacrifice depth. So Iron Bias is not an efficient tool at all.
It is logical then that the Minelab Manticore uses the ferrous/nonferrous nature of target readings in order to determine where to plot targets on the 2-D Target Trace screen.
For Instance
(Below: Minelab Manticore Screenshot)

(Below: Minelab Manticore 2-D Target Trace Screen close up with explanation)

Ferrous Limits Vs Iron Bias
As stated by the Minelab Rep, Ferrous Limits is basically Iron Bias. If you fill in any part of the upper or lower ferrous limits, you are discriminating out a specific TID range of Iron, and therefore you are making your processor work harder, sacrificing depth, and masking targets.
This is why it is NOT a good idea to use any iron discrimination, or other discrimination and instead use your brain as the processor.